How to deploy sites via GitHub
November 2, 2011
After one my last posts about GitHub and how it’s saved my ass a number of times, I had a few requests to detail just how I deploy sites with GitHub. So, here we go!
First, some background
I host this site, and a number of others, with Media Temple. My code, however, is verson-controlled with GitHub, where I have a paid account, the $12/month plan. That’s namely for the remote-hosted private repos they provide, but I also use GitHub to contribute to a few repos, watch numerous others, and of course maintain Bootstrap.
Using GitHub for site deployment is pretty straight forward. However, to get started, you need to have a hosting provider that allows SSH access and has git installed. If you don’t have SSH enabled, search your hosting provider’s docs. If you need to install git, a quick Google search reveals some solid enough posts about it.
Now, the how-to
After covering the background details, the rest of this how-to assumes you have a paid GitHub account (for the private repo), SSH access enabled, and git installed on your server. Here’s a quick summary of what we’ll be doing:
- Setting up a private GitHub repo
- Cloning your repo locally
- Add some code
- Cloning your repo via SSH
- Handling maintenance
- Few other tips
Now, let’s get to it!
1. Setup your private GitHub repo
The first step is to create a private repo on GitHub.com. It’s the same as creating any other repo, you just have to check the right option in the setup and you’re golden.
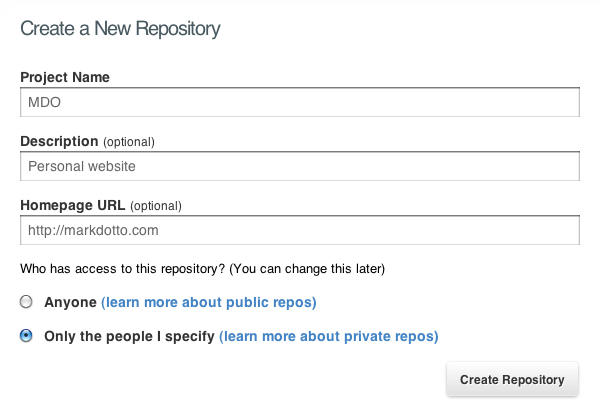
When you create your new repo, just check the option that says “Only the people I specify” for repo access. Now you have a brand new, completely empty, and private repo ready for code.
Note: I prefer a private repo for my personal site as I don’t see any point in anyone viewing those files or contributing to them. Feel free to use a public one, but be warned anyone can browse your stuff.
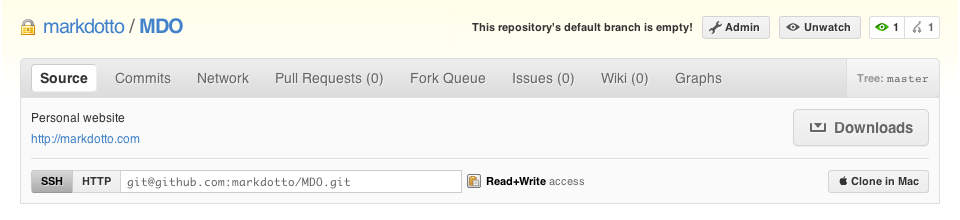
2. Clone the repo locally
Before we can do anything with our repo, we need to clone it locally and add all our code to it. To do so, just snag the URL of the repo. You’ll find it on your new repo’s page on GitHub.com; it looks like this:
Copy that (manually or via the little clipboard icon) and open up your favorite command line tool (I prefer Terminal). Browse to where you’d like to keep your code locally (on a Mac, I prefer Sites) and we’re ready to clone that repo.
$ cd Sites/
$ git clone [REPO_URL]
If successful, you’ll see something like the following:
$ Initialized empty Git repository in ~/Sites/[REPO_NAME]/.git/
$ Warning: You appear to have cloned an empty repository.
That means you’ve successfully cloned your new repo and that it’s empty–all good things. You know have an empty directory called [REPO_NAME] in your sites directory. Now, let’s add code.
3. Add your code
The key thing about this step isn’t what you add neccesarily, but how you add it. After you paste or move your files into the newly created directory, you have to add, commit, and push your code to GitHub’s remote server. Let’s walk through that step-by-step.
First, add the files so git can track them:
$ git add .Then, commit them so you can push:
$ git commit -am "[COMMIT_MESSAGE"And lastly, push all pending changes:
$ git push origin masterBoom, all your files are now pushed to GitHub’s servers and you’re now ready to get your code on your own server.
4. Deploy to your site via SSH
Now that GitHub is tracking your new code, we can connect to your server via command line and pull another copy of it down. To do so, we have to SSH and clone the repo (as we did in Step 2) one more time. I won’t cover how to use SSH here as that’s a bit out of scope, so I’ll use a generic SSH command here:
$ ssh username@website.comOnce connected, navigate to your domain and clone the repo once more, this time right to your server:
$ git clone [REPO_URL]Once the clone is complete, you have all your files on the server and should be ready to rock! Moving forward, keeping your code up to date is just a matter of working remotely, pushing changes to GitHub, and pulling them down to your server when you’re ready.
Upkeep
As I mentioned above, keeping your site up to date is easy so long as you keep both your local and remote code in sync with git. To do so, repeat Step 3 to push code to GitHub, SSH to your server, then pull the updates like so:
$ ssh username@website.com
$ git pull origin master
Done deal–all your code should be updated.
Mac users: using your .bash_profile
If you’re on a Mac, you can use .bash_profile to setup aliases to make Terminal commands that much easier. To get started, either create or make a new .bashprofile file in home folder. Open it up and add the following:
alias sites='cd ~/sites'
alias mdo='cd ~/Sites/mdo.com'
alias add='git add .'
alias push='git push origin head'
alias pull='git pull'
alias pp='pull && push'
alias st='git status'
alias master='git checkout master'
alias sshmdo='ssh [domain.com@server.com]'
alias editbash='subl ~/.bash_profile'
Save out the file and open a new tab in Terminal and you can use your new aliases. The above aliases allow me to quickly get to my Sites directory, make git commands super fast, and SSH quickly.